How to Choose the Right Exposure when Scanning
- Valoi
- Jan 27, 2023
- 5 min read
In order to get the most out of your scans you need to expose the negative properly when you are digitising it. This article summarises the key areas you need to focus on to make a proper exposure.
What is metering
Metering is how your camera determines what the correct shutter speed should be given your ISO and aperture. When digitising negatives with your camera, it is recommended to use base ISO, the lowest ISO setting that your camera can shoot at. This is typically 100 ISO. You should also always use the optimal aperture of your lens to give you the sharpest image, this is normally around f/8, but depends on your lens but can be determined empirically with testing or you can ask in the community if anyone has done the testing for your specific lens.
Different metering modes
Matrix Metering, often the default metering mode in modern cameras, is useful for complicated scenes as it is less easily biased by extreme light or darkness in parts of the scene. In addition to splitting the whole frame into various zones, which are all individually evaluated for lightness and darkness, this metering mode prioritises the area of focus.
Spot metering mode only uses the focal point (or often centre spot) to determine the shutter speed. This means that if the middle of your image happens to be dark, your camera will think the whole image is dark and overexpose.
Centre-weighted metering is a mode where the centre of the frame is heavily prioritised but where the outer area as also counted - it has the same downsides as the spot metering above, but is less sensitive.

Metering done right
When using automatic exposure, you should use matrix or evaluative metering (they refer to the same thing). This evaluates more of the frame and makes sure highlights and shadows aren’t clipped, resulting in a balanced exposure. This way, you will make an exposure that ensures as much of the range of the negative is contained in the exposure and may potentially be quite different from spot meter or central weighted metering.
But wait- the orange base!?
The base of colour negative film varies a bit and can sometimes takes on quite dark shades of orange, depending on the film stock. We have to factor this in when we make our exposure. Here is our recommended approach:
Set the white balance on your camera to tungsten to negate the worst of the colour from the film mask, helping you see the negative better and the meter evaluate the scene better.
Change the exposure until the film rebate is nearly completely white (this is appropriate for rolls of film with consistent exposure for example, controlled studio lighting). In cases where exposure on the roll is variable, make use of AP (Aperture Priority) mode to get the best exposure for each frame. We will get back to dialing in exposure compensation below.
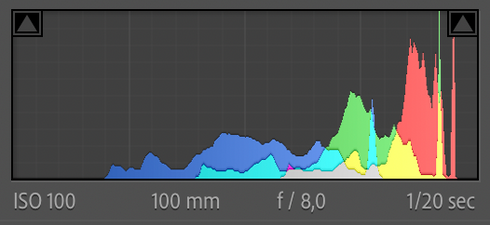
The image histogram is a tool that many technical shooters make use of, either in camera, or during post-processing. While it is intuitive to understand, it may be confusing at first. The most common use of this concept in camera scanning is probably when finding the right exposure for digitising negatives. It is recommended to “shoot to the right of the histogram”. We will get to that after we have covered some basics.
Clipping
Clipping is a term often used in the context of histograms. What do we mean when we refer to clipping? In general clipping is undesirable and occurs when areas of an image contains no information - in other words, an area of the image is outside the range of the camera sensor. This can present as either clipped highlights (pure white) or clipped shadows (pure black) and is due to extreme over- and underexposure. Clipping can be diagnosed by inspecting the histogram. When you make an image it is often a priority to capture a full tonal range, including whites, highlights, middle tones, shadows and blacks. This would result in a balanced histogram. Clipping is observed as an extremely skewed histogram, when the tail on the left or right is very compressed into either side. Below you will see some examples of this.
Understanding the histogram
Like normal histograms, this graph represents a frequency distribution of a variable. The simplest way to think about it is pixel frequency per tones. Tone (bottom axis) is plotted against its frequency (left axis). Depending on the complexity of the histogram it may also show the distribution for each colour channel. The below are B&W which is why no separate colour channels are visible. (You may scroll down to see some histograms showing colour channels.) While the middle of the graph represents mid tones, the left represents lighter tonal values and the right darker tones. The extremes of the graph on the right represent white and the extremes on the left, pure black.
Below you will see examples from 1-5, where the left image exemplifies number 1 below and the right, number 5.
A balanced histogram indicates a balanced exposure with full tonal range from low to high including mid tones.
A centrally compressed histogram indicates low tonal range and lack of extreme tonal values (low contrast/ grey/ flat image)
A stretched histogram (often with a lack of mid values) with major peaks on both extremes indicates a very high contrast image with potential loss of detail on both sides. Remember, anything in the histogram that is pushed too far left or right is clipped.
A skewed histogram with a major peak on the right indicates lightness, overexposure and potential clipping of highlights
A skewed histogram with a major peak on the left indicates darkness/ deep shadows, underexposure and potential clipping of darks


Exposing to the right of the histogram (ETTR)
This technique entails adjusting the exposure as high as possible at base ISO without clipping any of the colour channels. This gives you the maximum amount of light and therefore best output from your digital sensor. It gives more “levels” of information in the denser parts of your negative. Typically this can be achieved by overexposing by between +0.7 to +1.3 EV, according to your light meter in matrix metering mode. You increase the exposure to “see” through the film base. In addition to cutting through the noise, it will give greater tonal range in dark areas.
Left: A normally exposed negative and its histogram. Details in the denser areas are visible but recovery in post will increase noise and result in a worse scan.
Right: A negative exposed to the right (+1 EV) and its histogram. Details in the denser areas are visible and easily recoverable in post. Notice how the right part of the histogram is not outside of the range.


There are many things to keep in mind when scanning and proper exposure of negatives is only one part of it. You must use proper technique to ensure you get the results you want. Be sure to click below to see our other educational pieces on the topic of camera scanning.